Due to AWS’s increasing costs of acquiring IPv4 addresses, I thought I could cut down hosting costs by half by hosting this blog and my personal Nextcloud instance on a single AWS Lightsail instance. In this post, I will outline how to make use of the Apache server’s VirtualHost option to serve two websites at the same time. In a business setting, developers usually run different services on different machines, reducing the possibility of multiple services failing at the same time. But saving money is probably the most important thing for people like us who write blog posts for fun.
We have two servers, one for Nextcloud and one for this WordPress blog. Nextcloud is hosted on an Ubuntu machine, installed via Snap, while the WordPress blog is running on a Bitnami WordPress instance. Maintenance on Bitnami is a pain. After a bit of research, to update the stack on Bitnami, you will need to manually back up your data, delete the stack, and then reimport all of your data again (e.g., this guide). Therefore, I decided to migrate the WordPress instance to the Ubuntu machine.
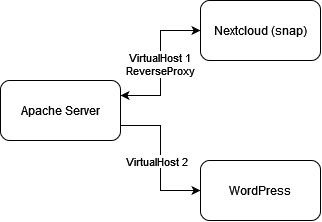
The new schema is simple enough. We have Nextcloud and its LAMP stack isolated inside the snap package. The Apache server will communicate with it using a reverse proxy. Nextcloud will also only accept connections from localhost. We will also need to install a new WordPress instance and have the Apache Server serve from the wordpress directory. Note that there are two Apache Servers, one on the Ubuntu machine, and one in the snap package.
Apache Server – ReverseProxy
After making a snapshot of everything on AWS Lightsail, we can work on creating the reverse proxy and using it to access Nextcloud. Remember that Nextcloud is already running on ports 80 and 443, so we need to change its ports. We also disable HTTPS. From the GitHub page:
sudo snap set nextcloud ports.http=81 ports.https=444
sudo nextcloud.disable-https
Then we can install Apache on the Ubuntu machine:
sudo apt update
sudo apt install apache2
sudo a2enmod ssl proxy proxy_http proxy_wstunnel rewrite headers
To set up the reverse proxy, we can add a file /etc/apache2/sites-available/001-nextcloud.conf using VIM 🙂, thanks to this amazing guide on the Nextcloud forums:
<VirtualHost *:80>
  ServerName domain.com
  ErrorLog ${APACHE_LOG_DIR}/nextcloud-error.log
  CustomLog ${APACHE_LOG_DIR}/nextcloud-access.log combined
  ProxyPreserveHost On

  # Certbot added
  RewriteEngine On
  RewriteCond %{SERVER_NAME} =domain.com
  RewriteRule ^ https://%{SERVER_NAME}%{REQUEST_URI} [END,NE,R=permanent]
</VirtualHost>

<VirtualHost *:443>
  ServerName domain.com
  ErrorLog ${APACHE_LOG_DIR}/nextcloud-error.log
  CustomLog ${APACHE_LOG_DIR}/nextcloud-access.log combined
  ProxyPreserveHost On
  ProxyPass / http://localhost:81/
  ProxyPassReverse / http://localhost:81/
  Header always set Strict-Transport-Security "max-age=15552000; includeSubDomains"
  RewriteEngine On
  RewriteRule ^/\.well-known/carddav https://%{SERVER_NAME}/remote.php/dav/ [R=301,L]
  RewriteRule ^/\.well-known/caldav https://%{SERVER_NAME}/remote.php/dav/ [R=301,L]

  # Certbot added
  SSLEngine On
  SSLCertificateFile /etc/letsencrypt/live/domain.com/fullchain.pem
  SSLCertificateKeyFile /etc/letsencrypt/live/domain.com/privkey.pem
  Include /etc/letsencrypt/options-ssl-apache.conf
</VirtualHost>

# vim: syntax=apache ts=4 sw=4 sts=4 sr noet
You can leave out the stuff below # Certbot added for now. We can install Certbot through snap:
sudo snap install --classic certbot
sudo certbot --apache
and go through the process of obtaining an SSL certificate for your Nextcloud instance. I also replaced 000-default.conf with the following:
<VirtualHost *:443>
        ServerName localhost
        SSLEngine On
        SSLStrictSNIVHostCheck On
        SSLCertificateFile /etc/ssl/certs/ssl-cert-snakeoil.pem
        SSLCertificateKeyFile /etc/ssl/private/ssl-cert-snakeoil.key
        <Location />
                Require all denied
        </Location>
</VirtualHost>
Notice the SSLStrictSNIVHostCheck On option in the config. This is to prevent people from connecting to Nextcloud by directly entering the IP address. The tl;dr is that when clients connect to the server through HTTPS, the HTTPS protocol is executed first before the client sends any data including the requested host. But which HTTPS config should the Apache server provide? Without the name of the requested host, Apache will serve the first config that has HTTPS in it, which is 000-default.conf. I’m not sure how much protection this provides but let me know if there is a security issue!
sudo a2ensite 000-default.conf
sudo a2ensite 001-nextcloud.conf
sudo systemctl restart apache2
Now you should be able to access your Nextcloud instance through your browser at domain.com.
Apache Server – WordPress
Similarly, we can add another website to 002-codehen.conf. This means that we will unpack the WordPress bundle under /srv/www/wordpress.
<VirtualHost *:80>
    ErrorLog ${APACHE_LOG_DIR}/codehen-error.log
    CustomLog ${APACHE_LOG_DIR}/codehen-access.log combined

    ServerName codehen.com
    RewriteEngine on
    RewriteCond %{SERVER_NAME} =codehen.com
    RewriteRule ^ https://%{SERVER_NAME}%{REQUEST_URI} [END,NE,R=permanent]
</VirtualHost>

<IfModule mod_ssl.c>
<VirtualHost *:443>
    ErrorLog ${APACHE_LOG_DIR}/codehen-error.log
    CustomLog ${APACHE_LOG_DIR}/codehen-access.log combined

    ServerName codehen.com
    DocumentRoot /srv/www/wordpress
    <Directory /srv/www/wordpress>
        Options FollowSymLinks
        AllowOverride Limit Options FileInfo
        DirectoryIndex index.php
        Require all granted
    </Directory>
    <Directory /srv/www/wordpress/wp-content>
        Options FollowSymLinks
        Require all granted
    </Directory>
SSLCertificateFile /etc/letsencrypt/live/codehen.com/fullchain.pem
SSLCertificateKeyFile /etc/letsencrypt/live/codehen.com/privkey.pem
Include /etc/letsencrypt/options-ssl-apache.conf
</VirtualHost>
</IfModule>
and 999-catchall.conf:
<VirtualHost *:80>
  ServerName your_ip_address
  RedirectMatch permanent ^/(.*)$ https://www.google.com/
  ErrorLog ${APACHE_LOG_DIR}/catchall-error.log
  CustomLog ${APACHE_LOG_DIR}/catchall-access.log combined
</VirtualHost>

<VirtualHost *:443>
  ServerName your_ip_address
  RedirectMatch permanent ^/(.*)$ https://www.google.com/
  ErrorLog ${APACHE_LOG_DIR}/catchall-error.log
  CustomLog ${APACHE_LOG_DIR}/catchall-access.log combined
  SSLEngine on
  SSLCertificateFile /etc/ssl/certs/ssl-cert-snakeoil.pem
  SSLCertificateKeyFile /etc/ssl/private/ssl-cert-snakeoil.key
</VirtualHost>
Now you can follow guides to install WordPress on your Ubuntu machine, such as that on the Ubuntu website. I do suggest using MariaDB over MySQL though, as MariaDB is open source. Then you can use something like All-in-One WP Migration and Backup to migrate the WordPress site data.
Leave a Reply